Materials: (2014~2016, 7 speed automatic transmission).
Refer to the service manual, TM pages 205-207.
Tip 1)
Use 4 of jack stands to make the car level. Put the car on the stands until job is completed.
Tip 2)
Loosen the overflow bolt first using 5mm Hex. If it doesn't work, use locking plier. Put drain container under the bolt and remove the bolt. 1.5qt of ATF will drain.
Tip 3)
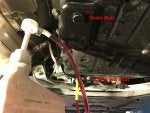
Remove the drain bolt (19mm socket) and drain the ATF. 2qt of ATF will drain.
Tip 4)
Insert the Yamaha adapter (the manufacturer calls it a Yamaha adapter) to the overflow hole. It has a different thread pitch but it works !!! DO NOT TIGHTEN the adapter too much. Use only fingertip not to cross-thread it.
![Image]()
![Image]()
Tip 5)
Leave the pump/adapter connected even while starting engine, waiting 1 minute, draining the fluid, refilling, starting engine, waiting 1 minute, draining, refilling... Disconnect the pump/adapter at the last step.
Tip 6)
Drain bolt torque: 34 Nm
Overflow bolt torque: 12.4 Nm
Tip 7)
1st drain: 3.5qt (1.5qt + 2.0qt)
1st fill: 3qt
2nd drain: 3 qt
2nd fill: 3 qt
3rd drain: 3 qt
3rd fill: 4 qt (0.5qt more)
Tip 8)
Fluid Level at the final step: Start engine, push brake pedal and shift gear lever to P -> R -> N -> D -> N -> R -> P -> R -> N -> D -> N -> R -> P and leave the lever at P position. Wait until the drain pan temperature reaches 40C(104F). Disconnect the pump/adapter from the overflow hole. ATF will drain a little and start to drip. (PS: If ATF doesn't drain when you disconnect the adapter, you need to fill more ATF). Install new overflow bolt (Torque: 12.4Nm).
Tip 9)
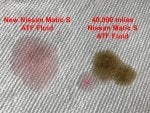
The ATF is filled for lifetime but the condition at 40k miles was marginal. I'm so glad I replaced it today.
![Image]()
- Nissan Matic S ATF 1qt - Part# 999MPMTS00P : 12EA ($90 at Infiniti Dealer)
- Overflow Plug/Bolt - Part# 31361-1XJ0A : 1EA ($1.25 at Infiniti Dealer)
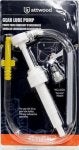
- Gear Lube Pump : 1EA ($4.87 at Walmart, Item #004580089 )
- 5mm Hex (for overflow bolt)
- 19mm Socket (for drain bolt)
- Locking Plier (if overflow bolt was fastened too tight)
- Jack Stands 4EA, Floor Jack.
- Torque Wrench, Sockets, Paper Towel, Drain Container, IR Thermometer, Brake Parts Cleaner.
Refer to the service manual, TM pages 205-207.
Tip 1)
Use 4 of jack stands to make the car level. Put the car on the stands until job is completed.
Tip 2)
Loosen the overflow bolt first using 5mm Hex. If it doesn't work, use locking plier. Put drain container under the bolt and remove the bolt. 1.5qt of ATF will drain.
Tip 3)
Remove the drain bolt (19mm socket) and drain the ATF. 2qt of ATF will drain.
Tip 4)
Insert the Yamaha adapter (the manufacturer calls it a Yamaha adapter) to the overflow hole. It has a different thread pitch but it works !!! DO NOT TIGHTEN the adapter too much. Use only fingertip not to cross-thread it.
Tip 5)
Leave the pump/adapter connected even while starting engine, waiting 1 minute, draining the fluid, refilling, starting engine, waiting 1 minute, draining, refilling... Disconnect the pump/adapter at the last step.
Tip 6)
Drain bolt torque: 34 Nm
Overflow bolt torque: 12.4 Nm
Tip 7)
1st drain: 3.5qt (1.5qt + 2.0qt)
1st fill: 3qt
2nd drain: 3 qt
2nd fill: 3 qt
3rd drain: 3 qt
3rd fill: 4 qt (0.5qt more)
Tip 8)
Fluid Level at the final step: Start engine, push brake pedal and shift gear lever to P -> R -> N -> D -> N -> R -> P -> R -> N -> D -> N -> R -> P and leave the lever at P position. Wait until the drain pan temperature reaches 40C(104F). Disconnect the pump/adapter from the overflow hole. ATF will drain a little and start to drip. (PS: If ATF doesn't drain when you disconnect the adapter, you need to fill more ATF). Install new overflow bolt (Torque: 12.4Nm).
Tip 9)
The ATF is filled for lifetime but the condition at 40k miles was marginal. I'm so glad I replaced it today.